Forecasting Setup And Management
Company options
When you create a company, you have to make some choices related to the forecast, such as the length of the forecast, start date, and currency type. However, if you change your mind about these settings later, you can easily adjust them. This article explains how to change these company settings.
Note: It's important to remember that if you make any changes to your forecast settings, they will apply to all scenarios in that forecast.
Changing the company name
Your company name is displayed in various locations throughout LivePlan. It appears at the top of the left sidebar and will be visible on the cover page of any plan or report you export, as well as in your Pitch.
Note: If you have already published your Pitch as a web page, you must re-publish it to reflect the new name.
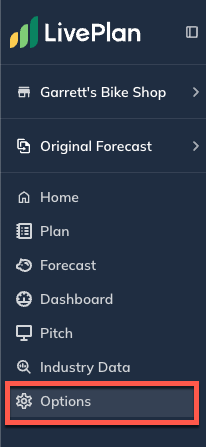
In the left sidebar, click Options:
In the Company name field, enter a new name:

Click Save Changes:

Changing the forecast length
LivePlan comes with a default forecast that spans three years. It includes two years of monthly financial detail and one year of annual detail. However, you can easily customize these settings as you prefer.
If you started with a 5-year forecast and want to shorten it to 3 years, you can do so easily. However, note that this change will permanently delete all data from years 4 and 5 of your forecast. If you want to keep this data, you should make a copy of your plan first and then shorten the original's length.
To change the forecast length:
In the left sidebar, click Options:

Under Length of forecast, select the number of years you want your forecast to cover:

Click Save Changes:

Reducing the total forecast length
If you have a forecast that you wish to shorted you can easily do so. Remember that this change will permanently delete any data from later years of your forecast. For example, if your original forecast length was 5 years and you shorten it to 3 years the data from years 4 and 5 will be discarded. To retain this data, we recommend making a copy of your plan first, then shortening the original's length.
This message will appear when you shorten a forecast:

Click Confirm to shorten your forecast. Once deleted, the later-year forecast data cannot be recovered.
Changing the amount of monthly detail
In the left sidebar, click Options:

Under Monthly detail, select one, two, three, or five years of monthly detail from the drop-down menu:

Note: To forecast for 5 years with monthly detail, the forecast length must be set to 5 years.
Click Save Changes:

Changing your forecast start date
If you are forecasting for a new business, we recommend selecting a start date for your LivePlan forecast that reflects when you first begin to experience financial activity, such as spending or sales. This way, any start-up costs you incur as you prepare to open your business are captured in your forecast.
To change your forecast start date:
In the left sidebar, click Options:

Find the Plan Start Date and click Change:

From the menu that pops up, select your new forecast starting date using the First year of forecast and Start of fiscal year settings:

Once you've selected your new starting date, choose to either Move values with start date or Keep values in the same actual months. You can learn more about these features here: Changing when your forecast starts
Note: For existing businesses, the Start of fiscal year and the 1st Year of Forecast are not the dates your business was initially established. Instead, you should enter the first month of your current or next fiscal year cycle.
Click Save Changes:

Determining your forecast start date: Calendar Year or Fiscal Year?
Adjusting your LivePlan forecast to match a calendar or fiscal year is possible. If you set your forecast's start date to January, LivePlan will generate a forecast from January through December, reflecting a calendar year. When you set your forecast start date to a month other than January, LivePlan will create a fiscal year structure in which each year runs 12 months from its start date.
For example, if you start a forecast in June 2025, the fiscal year would run from June 2025 through May 2026. When you have a fiscal year forecast, the fiscal years are labeled according to the year they end.
Using the previous example, with a forecast starting in June 2025, the fiscal year would end in May 2026, labeled Fiscal Year 2026. All financial statements and tables will display that year as "FY2026," as shown below:

What if I need the first year to be a partial year?
LivePlan always includes 12 months of detail for the first year of your plan. If you need to use a calendar year structure (starting in January), but your revenues and costs begin later, you can build your forecast entries so that the initial months are zeroes. To do this, use the Varying amounts over time input for each forecast entry.
In this case, you may also want to change the number of years that have monthly detail in your forecast to have monthly entries available for up to five years of the forecast.
How this change affects your forecast entries
When you change the start date of a forecast that already has existing entries, the start date of every entry will shift accordingly. For example:
Let's say your forecast starts in April 2025, and you have several revenue streams that also begin in April 2025. If you change the start date of this forecast to June 2024, all those revenue streams will now start in June 2025.
Let's say that your forecast starts in April 2025, and you have some expense items that begin four months later, in August 2025. If you change your forecast start date to June 2025, these expense items will still begin four months after the new start date, which moves them to October 2025.
Once you've changed your forecast start date, you can go back and edit your existing forecast items as needed.
How this change affects forecast scenarios
This feature is available to LivePlan Premium users. To learn more about LivePlan Premium, please click here.
Suppose you're using multiple forecast scenarios in your company. In that case, it's important to know that changing the start date of one forecast will automatically make the same change to every other forecast attached to the same company.
If you'd like to create multiple forecasts for the same company with different start dates, it's best to make one or more copies of your company and change the start dates of the copies.
Changing the currency format
For each company in your LivePlan account, you can designate the currency symbol and number separator (comma or period) you want to use. This setting only changes the currency details; it does not perform currency conversions. The numbers you enter will remain the same regardless of the currency symbol and number separator you choose.
To change the currency symbol
In the left sidebar, click Options:

Under Preferred currency, choose the desired currency symbol:
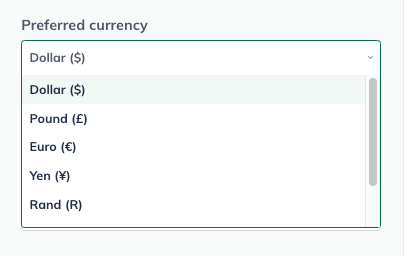
If the symbol you want to use isn't listed, choose Other and enter the desired symbol in the field provided:

Click Save Changes to apply the new setting:

To change the number separator
In the left sidebar, click Options:

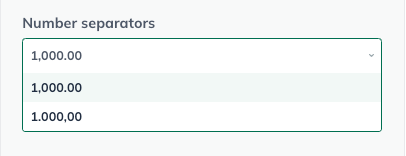
Under Number separators, choose the desired number separator:
Click Save Changes to apply the new setting:

Changing the setting for multi-month charges
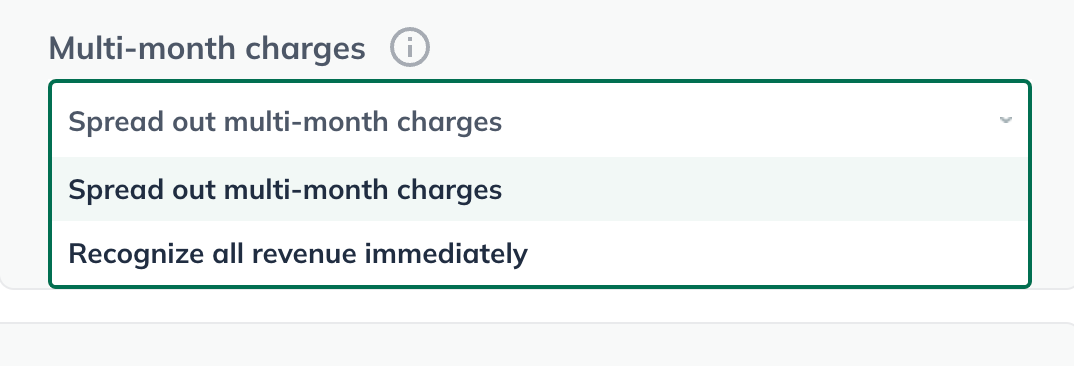
If you have revenue streams with recurring charges that cover multiple months, LivePlan gives you two options:
To spread those charges out (generally referred to as accrual-based accounting)
To recognize the revenue immediately when you receive it (generally referred to as cash-based accounting)
To change the setting for multi-month charges:
In the left sidebar, click Options:

Select the option you prefer under Multi-month charges:
Click Save Changes in the upper-right corner of the Options menu:

How do I choose?
If you are unsure about which option to choose, it is recommended that you select "Spread out multi-month charges," as this is the default setting and follows best practices in accounting. When you receive payment upfront for services that will be rendered over several months, it is generally appropriate to put that money on the balance sheet and recognize the revenue on a monthly basis. This method is known as accrual-based accounting.
For example, when our customers buy 12-month subscriptions to LivePlan, we count 1/12 of the total fee each month as revenue in our financial statements. The remaining balance is kept on our Balance Sheet as Prepaid Revenue until it is fully utilized at the end of the subscription year.
LivePlan provides an option to immediately recognize revenue, which is ideal for businesses that follow cash-based accounting. This method is straightforward and might be preferable for certain types of businesses, particularly small or sole proprietorship entities that don't maintain inventory and primarily deal in immediate cash transactions. Examples of businesses that might use cash-based accounting are food trucks, artists, and smaller home-based businesses.
Make sure your forecast and actuals use the same type of accounting
If you use accounting software, it's important to ensure that your choice in LivePlan matches the one you made in your accounting system. Otherwise, the data on the Dashboard will be misleading.
When you set up QuickBooks Online or Xero, you are given a configuration option to use either cash-based or accrual-based accounting. If your accounting system is cash-based and you choose the option in LivePlan to Spread out multi-month charges (accrual method), your results will look like you are making much more money than expected, but the variance will just be a matter of timing.
Changing the plan language
LivePlan currently supports U.S. English, U.K. (Oxford) English, French, German, Italian, Spanish (ES and Latin America), or Portuguese. You can choose to have the section titles and table labels in the Pitch and Plan appear in any of these languages. You can then write the rest of your pitch or plan in this language as well.
The instructions and examples in LivePlan are in English by default, but the LivePlan Assistant can generate custom instructions for each plan topic that are specific to your business and industry.
Note: Please note that the customized instructions will be generated in the same language as the "Plan language" setting in the Options menu..
If you'd like to create a business plan or Pitch in another language, you can certainly write your plan content in your language of choice in the software.
Note: LivePlan can't translate your plan's text; only the section titles and table labels will be translated.
If you need these elements translated into language not listed above, we recommend downloading your finished plan as a Word document, and making the translations within Word.
In the left sidebar, click Options:

In the Plan language section, choose a language from the pull-down menu, then click Save Changes:

The section titles and table labels in your plan will now appear in the language you've chosen:

Customized titles can't be translated
If you have changed the title of a chapter, section, or topic in your plan and then change the language, LivePlan can't translate your customized title. You will want to re-enter this title in the language of your choice.
The same applies to creating a custom chapter, section, or topic. You'll want to title it in the language of your choice - LivePlan can't translate a custom title from English.
Republish your Pitch after translation
If you have published your Pitch as a web page in English and then change the language, you will need to republish the Pitch to have your web page display the new language.
Does LivePlan support international languages?
The LivePlan software supports business plans and pitches written in any language, though the instructions and examples are only available in English. LivePlan can translate the section titles and table labels in your plan into French, German, Italian, Spanish, or Portuguese.
Note: LivePlan can't translate your plan's text; only the section titles and table labels will be translated.
If you need these elements translated into a language not listed above, we recommend downloading your finished plan as a Word document, and making the translations within Word.
Changing Collaborator access
You can select which users in your LivePlan account have access to your current active plan. Users with access will have a checkmark next to their name:
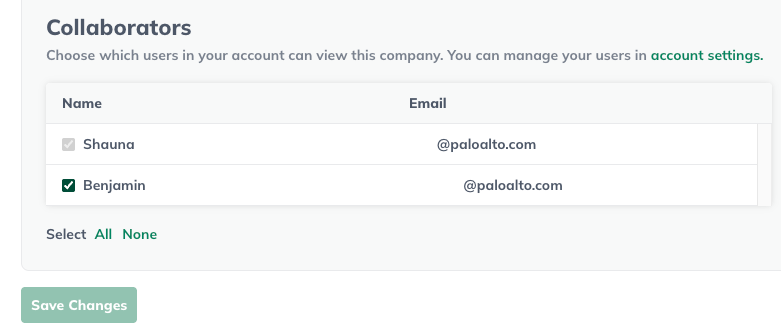
Once the new selections have been made, click Save Changes:

Note: Both current and invited users will be displayed on this list. For more details on user management in your LivePlan account please see:
Adding and removing contributors and guests - Step-by-step instructions for adding contributors and guests to your LivePlan account.
Collaborating in LivePlan - Detailed guide covering how to leverage LivePlan's collaboration tools
